2020 - Miss Clark's Spoonful

Soup Sunday #4 - Holiday Chili Edition!

Happy last Sunday of 2020! I hope everyone enjoyed a joyous holiday.


I love to learn about different holiday traditions, and it warms my heart to hear about what brings people joy during this time of year.


That being said, I'm cheating a little bit on this final Soup Sunday. I'm also a little late with timing, as this recipe is called Christmas Eve Chili.

For as long as I can remember, my family celebrated Christmas Eve by enjoying dinner with long-time friends in the form of Chili! Even though we couldn't see these dear friends in person this year due to COVID, we still celebrated by having Chili at home. It wouldn't be Christmas Eve without it!

Even though Christmas has come and gone, this recipe would be deliciously perfect for any holiday-eve.

CHRISTMAS EVE CHILI


chili ingredients

DIRECTIONS


1. In a slow cooker, add ground beef, onion, salt, chili powder, bay leaf, and Worcestershire sauce. Bonus points if you can say "Worcestershire sauce 3 times fast, or at all.

2. Add in tomato sauce and kidney beans. Gently stir to combine. Cover and cook on LOW for 6-8 hours or overnight. Discard bay leaf.

Serve garnished with shredded Sharp Cheddar Cheese, and enjoy the coziness!

chili with shredded cheese

Wishing you all the best for what's ahead in 2021!

0

Soup Sunday #3 - The Easiest Crockpot Chicken Noodle Soup

Hi again, friends!

I hope this finds you gearing up for the holidays, and enjoying a little bit of rest & relaxation. 

We can dream, right?

This week's Soup Sunday brings you good old fashioned comfort food. It's just what we all need this time of year!

There's something souper (see what I did there?) magical about letting your slow cooker do it's thing, and having a delicious result.

CROCKPOT CHICKEN NOODLE SOUP

Recipe adapted from Spend with Pennies

chicken noodle soup ingredients
1. 1½ lbs Boneless, Skinless Chicken Breasts - trimmed of excess fat
2. 1 Yellow Onion - diced
3. 3 Large Carrots - peeled and chopped into "coins"
4. 2 Stalks Celery - chopped
5. 4 Cloves Garlic - roughly chopped
12. 8 oz. Package Egg Noodles - wide or extra wide
13. Fresh Parsley - minced (for garnish)

DIRECTIONS


1. To the bottom of a large slow cooker, add trimmed chicken breasts. Add onion, carrots, celery, garlic, thyme, rosemary, salt & pepper, and bay leaf.

2. Add chicken broth. Gently stir to combine. Cover and cook on LOW for 6-8 hours, or HIGH for 3-4 hours.

3. Remove chicken from slow cooker and place in a large mixing bowl. Shred chicken. Discard bay leaf, and return shredded chicken back to slow cooker.

4. Cook egg noodles al dente according to package directions.

5. Add egg noodles to soup. Cook on LOW for 3-5 minutes to allow flavors to blend.

Serve garnished with fresh parsley and a sprinkle of black pepper.

homemade chicken noodle soup

This one's a classic. Enjoy!

0

Soup Sunday #2 - Chicken Tortilla Soup

Happy Sunday!

Today's soup is brought to you by one half of two of my very favorite people ever (that's enough math for today).

Chip & Joanna Gaines!

I'm just discovering what TikTok is about (I know, go ahead and laugh) but this opinion of them is pretty in line with mine! Wait for it...
 

Every mom at #target CHRISTMAS EDITION! 🎄☃️✨ #momlife #momsoftiktok #fyp


Anyway, let's get back to the soup before we all start mindlessly scrolling.

Joanna is the one who developed this recipe, and it's so deliciously easy that it'll knock your socks off. It's perfect for any winter weeknight dinner.

Enjoy!

CHICKEN TORTILLA SOUP

Recipe by Joanna Gaines

chicken tortilla soup ingredients
4. ¼ Red Onion - finely chopped
5. 1½ Jalapeño - finely minced
11. 1 Avocado - pitted, halved, and diced

DIRECTIONS


1. In a large soup pot or dutch oven, combine the broth, tomato, corn, onion, jalapeño, salt, and black pepper. Bring to a boil over medium-high heat. Reduce heat and add in the shredded chicken. Simmer until heated through.

2. Stir the rice mix into the soup. Add cumin and simmer for 15 minutes until rice is cooked through.

3. Place avocado and crushed tortilla chips in serving bowls. Ladle in the soup.

Serve immediately.

chicken tortilla soup

I hope you have a great rest of your weekend!

0

Soup Sunday #1 - Cauliflower Soup

Happy December!

Kids have the best lunch conversations.

True story: while I was eating lunch with my second graders this week, one student said to me, "Hey, Miss Clark! Do you think it would be interesting to hear what I have for dinner every night of the week?"

Naturally, I was intrigued.

He went through the entire week of themed dinners he has with his family: Sauce Sunday, Meat Monday, Taco Tuesday, Wings Wednesday, Tingly Thursday (wings again, but spicy?), Friday is pizza night, and for the life of me,  I can't remember what Saturday was. I'll ask him and update you!

1. This was a hilarious story.
2. It got me thinking, December means that it's soup weather.

So I thought... SOUP SUNDAY just makes sense!

I love to make soup all winter. It's cozy, comforting, and just brings out all of the warm, fuzzy feelings.

----------

Each Sunday this December, I'm happy to bring you some of my very favorite soup recipes!

First up this week, Cauliflower Soup! It's creamy, savory, and super comforting.

CAULIFLOWER SOUP

Recipe by The Pioneer Woman

cauliflower soup ingredients

1. 1 Stick Butter - divided
2. 1/2 Yellow Onion - finely diced
3. 1 Whole Carrot - finely diced
4. 1 Stalk Celery - finely diced
12. 1 cup Sour Cream - room temperature

DIRECTIONS


1. In a large soup pot or dutch oven, melt 4 tablespoons butter. Add the onion and sauté for a 2-3 minutes, until it softens and starts to turn brown.

2. Add the carrots and celery and cook an additional 2 minutes.

3. Add cauliflower and parsley. Stir to combine.

4. Cover and cook over very low heat for 15 minutes. After 15 minutes, pour in chicken broth. Bring to a boil, then reduce heat and simmer.

5. In a small bowl, mix the flour with the milk and whisk to combine.

6. In a medium saucepan, melt 4 tablespoons butter.

7. Add flour-milk mixture slowly to the butter, whisking constantly.

8. Remove from heat and stir in 1 cup half-and-half. Add mixture to the simmering soup. Allow to simmer for 15 to 20 minutes. Add more salt & pepper as needed.

9. Just before serving, place the sour cream in a small serving bowl (or soup tureen if you're feeling fancy!). Add 2 to 3 three ladle-fulls of hot soup into the tureen, and stir to combine with the sour cream. 

This is magical, I swear.

10. Pour in remaining soup and stir.

Serve immediately.

cauliflower soup

Yum.

----------

While this soup is a delicious meal all on it's own, one of my favorite ways to enjoy it is with Popovers and Fig Jam along the side. It adds a touch of sweetness to the soup's savoriness.

Have a SOUPER Sunday! Do you have any favorite soup recipes? I'd love to hear about them!

0

Cozy Popovers and Fig Jam

You know those recipes that just fill your heart with joy?


One of those for me is my Aunt Laurie's Popovers. This recipe conjures up memories of cozy winter visits, warmth from the oven, catching up with conversation, and fuzzy socks.


Delightful.


I digress! Popovers... They're cozy, delicious, and savory. Best served warm, these little guys are the perfect partner for any soup, or simply dressed with a dash of butter or jam.


POPOVERS


DIRECTIONS


*Do NOT preheat the oven.*

1. Grease 12 large muffin tin cups or 12 custard cups.

2. In a small bowl, beat the eggs well.

3. Add milk, flour and salt. Lightly beat until just combined.

4. Fill the muffin tin cups or custard cups three-quarters full with the batter.

5. Place the pan on the center rack in the oven.

6. Set the oven at 450° F and turn it on. Bake for 30 minutes without opening the oven door.

Serve warm with butter, jam, syrup, or honey.

popovers
Photo (c) Food Network

----------

One of my favorite ways to enjoy popovers is with fig jam and alongside Cauliflower Soup.

cauliflower soup

Stay warm!

1

Managing Your Classroom Library... In the Age of COVID!

Happy September, friends!


I hope all is well and that you're easing into somewhat of a school-year routine.


We've finished our first two "weeks" of school here in Connecticut (one 3-day week and one 4-day week), and today, we dove into our first 5-day week. Copious amount of prayers, chocolate, wine, good thoughts, or any combination of the above are accepted! I'm right there with you, teachers. You're all superstars.


We are in-person teaching 5 days a week. At the same time, we're posting lessons online for our remote learners and for the event that we have to go fully online. It's A LOT. Seeing the kids every day is what's getting us through!


One aspect of our "new normal" in the classroom that has made me put my thinking cap on is discovering how to run a fully functional classroom library with little to no shared supplies.


After learning an important foundation lesson, how to choose a "good fit book," we had the grand opening of our classroom library as per usual! The students got to choose eight books to keep in their book boxes for the week. These books will be used during our dedicated "Read to Self" time every day.


These student look-a-like book box labels from Learning in Wonderland are the cutest, right?!


Our classes have been split into two cohorts that alternate the second grade classrooms each week. So, we only have 9 kids in our classrooms each week. In coordination to what our school health officials have advised, my co-teacher and I are keeping a selection of books with specific cohorts.


Back to book shopping, and running a classroom library in the age of COVID!


For morning work each Monday, the students shop for eight new books. These books stay in their book boxes for Read to Self all week, until the end of the week.


This is where the new classroom library star comes in... our Book Quarantine bin!


On the last day of the week, the second graders place their books in the Book Quarantine bin. Here, these well-loved books will sit for one week before they're placed back in our classroom library.

Before you know it, these well-rested books will be germ-free and ready to go back into the rotation for book shopping.

----------

If this is something you think would work in your classroom, I'd be so thrilled! You can download your very own labels for free HERE (choose between two different styles, each with three different sizes)!


----------

I'd love to hear all about how you're doing! Are you teaching in-person, online, or hybrid?

We're all in this together!

0

An Easy Guide to DIGITAL Classroom Newsletters & CLICKABLE PDFs!

I'm going to be honest...

I am much more of a paper person than a digital person. There. I said it.

Colored ink, bright card stock, it's all so much fun!

However, I have an exception to my "paper over digital" preference... and that exception is CLASS NEWSLETTERS.

Sending home newsletters is so important! Your class families get to read all about what is going on in your classroom, and they're informed about upcoming events. All great stuff!

Here's the thing. More often than not, paper newsletters and related forms end up buried on the bottom of backpacks, stuffed in the back of desks, or crumpled under the seat on the bus... never to be seen again.

I have the perfect solution for you! Send your newsletters home DIGITALLY using clickable PDFs.


Along with the information actually getting to your class families, here are a few of the reasons why I LOVE clickable PDFs!

  • They're super user-friendly, and easy to create.
  • You can email them as an attachment, upload to Google Classroom, and a bunch of other platforms!
  • You can include many different resources in ONE spot.

Let's dive into it! Here is how you can create PDFs that have "clickable" links.

----------

I use PowerPoint to create most of my resources, including my newsletters!

First, find the text that you want to link to the other website or document.

Tip: It's helpful to change the color in order to make it more noticeable. Simply highlight the text, and change to whichever bright color you like! Then, click OK.

Digital Classroom Newsletter

After you've changed the color of your text, you'll want to save your document as a PDF. Click File, and drop down to Save As.

Digital Classroom Newsletter

Name the document whatever you would like, and save it to a place on your computer where it will be easy to find! Then, next to File Format, choose PDF.

Saving PowerPoint as PDF

Now, you're ready to open your document as a PDF and embed your link!

Head over to your Google Drive, and find the document you want to link to from your PDF. 

In this case, I want to attach a link to a "Getting to Know Your Child" Back to School form that's located in my Google Drive.

In the upper right-hand corner, click on the three vertical dots. Then, drop down to Share.

Getting to Know Your Child Form

In order to be able to add the link to your PDF, you'll need to look under Get Link. So anyone you send the PDF is able to open the link, you'll want to change the sharing permissions from "Restricted" to "Anyone with the link."

In order to do this, click "Change to anyone with the link."

Google Drive Sharable Link

Now's the time to copy and paste it into your PDF!

Click Copy link from the document in your Google Drive.

Google Drive Shareable Link

I use Adobe Acrobat in order to edit PDFs.

Open your saved PDF from your computer, and it will look something like this. Find the text that you want to add a link to, and highlight it.

The text that you've highlighted will be where the link is embedded into.

Editable PDF

RIGHT CLICK, and choose Create Link...

Insert Hyperlink into PDF

Before you paste in your link to the document from your Google Drive, you can choose how the text will look on the PDF.

If you'd like to leave it how it looks (no border around your text), make sure that Invisible Rectangle is selected next to Link Type. I recommend this!

Then, click Next.

Insert Hyperlink into PDF

Now, paste the link from your Google Drive!

Click OK.

Insert Hyperlink into PDF

You've embedded the link right into your PDF. Now, when you hover over the text you want to link to your Google Drive, you'll be able to click on it, and it'll lead you right there!

Insert Hyperlink into PDF

Presto! You're ready to SAVE your PDF, and send it out. The best part is, you can send it as an email attachment, upload it to Google Classroom, your Google Drive, or whichever platform works best for you, your students, and their families!

----------

If you're interested, check out my last blog post about things I include in each & every newsletter to efficiently maximize home/school communication.


Editable Classroom Newsletter

Do you have any awesome digital teaching tips? I'd love to hear about them!

0

How To Create The Ultimate Classroom Newsletter

The start of a new school year is exciting for so many reasons. Above all, your classroom is refreshed and ready to welcome a new bunch of eager learners. You have incredible lessons planned, and before you know it, things will be up and running. There will be so much to share with your class families at home!

kindergarten newsletter


Why Classroom Newsletters?

Communicating with class families is essential when it comes to building a strong home/school connection. Newsletters are a way to give parents a peek at all of the wonderful things that are going on in your classroom. Families love to know what's happening in their child's classroom, and how they can support at home.


The nuts and bolts of class newsletters:
Content that makes families feel connected to their child's learning and the larger school community.


Not sure where to start? Find your answers here by including THESE 5 THINGS!


editable classroom newsletter template


1. HOW OFTEN AND WHEN?

Before you put together all of your amazing information, decide on how often you'll send your newsletter out (weekly? every two weeks? monthly?) and when you'll send them out. The best you can, make it consistent!

I send out a weekly newsletter to my class families, via email. I send the newsletter on the Friday morning before the week ahead. For example, I'd send my newsletter for the week of September 21st - 25th on Friday, September 18th.

Now, real talk friends... are there some weeks where I get the newsletter for the week ahead emailed on Saturday or Sunday? Of course, YES! Life happens. For the most part though, I really try to hold myself accountable to that Friday morning.

I've found that this is a perfect balance between families having enough time to review what's coming in the week ahead, and for me to have enough foresight to relay accurate information about what I'm actually going to be teaching.

Decide what works best for you and your class!

2. YOUR INFORMATION

It's super helpful for your name, grade level/room number, and contact info to be smack dab at the top of your newsletter! This is especially helpful for families who have more than one child at school. 

You can never be too clear about who you are, what expectations you have for your class, and how families can be in touch with you.

3. CURRICULUM INFORMATION

When I first started teaching, I was SO eager to let families know what their children were learning in school. I still am, but I've changed the way I present this information. Way back when, I'd write PARAGRAPHS about what was going on in the classroom. These paragraphs often included teacher jargon like balanced literacy, scope & sequence... yada yada. You get the idea.

Here's the thing. Parents have super busy lives and oftentimes, they weren't interested in didn't have time for reading my long-winded, thesis-quality paragraphs.

Things to remember when highlighting what your students are learning:

  • Big ideas in each subject area
  • Simplicity
  • Less is more
  • Avoid teacher lingo 

Reading these efficient highlights about the magical things that are going on in your classroom will keep families on track, and give some background info for the awesome work their children are bringing home.

4. REMINDERS


teacher memes


If you're anything like me, your life is filled with strategically-placed sticky notes with "don't forget's" and "remember to's." Having a dedicated place in your class newsletter for reminders about daily classroom life, school policies, special classes... you name it, is a must.

As the classroom teacher, you're covering your bases and making expectations clear. You stay on track, class families stay on track... everybody wins!

5. UPCOMING IMPORTANT DAYS

Including a place in your newsletter for future events allows you to give your class families a peek at what's ahead.

Parents will be thankful for this addition, so they can add these dates to their own calendars, request time off work for to chaperone that field trip, or book the babysitter for that mid-week day off school.

In my newsletters, I try to highlight upcoming events or special dates from the next month or two. This way, I know that I'm giving plenty of notice without looking too far ahead.

----------

You can download these FREE Editable August and September Newsletters if you're interested.
(They're part of the Free Resource Library!)

You can grab the editable newsletters for the ENTIRE YEAR right here.

Weekly/Monthly & Color/Black & White formats are included! Just type in your classroom happenings, and send 'em home to your families! Be sure to install the fonts KG Miss Kindergarten and KG Red Hands to edit the text.


Hopefully these newsletter templates help you kick off the year on a strong note with parent communication.

----------

If you'd like to learn a little bit more about how I love to build a strong home/school connection from the get-go, head on over to this blog post to read about how I begin establish these positive connections before the school year even starts!

meet the teacher letter


What are your best tips for effectively communicating class news? Would you add anything to the newsletter must-haves? I'd love for you to comment and let me know what's worked best for you and your class!

2

The Best 5 Tips for Distance Learning Planning

 miss clark's spoonful

Distance learning has taken lesson planning to a whole new level.

Trying to find the balance between the time-consuming aspect of planning for the week ahead behind a screen, and providing my students with content that comes closest possible to what they'd experience in the real-life classroom has been TRICKY. Also, my eyes sometimes feel like they're ready to pop out of my head from staring at a computer screen for hours on end.

Do our students deserve to enjoy wonderful lessons that are engaging, appropriately challenging, and that take them away from the screen? Yes. Here's the thing though... teachers, we deserve to spend our weekends with our families. We deserve to take a step back from this new normal and give ourselves a breather.

You don't have to spend your Sunday on Google Classroom, searching See Saw, or looking for great YouTube videos to support your awesome lessons. Here are a few tips I've found helpful to efficiently plan for the week ahead!


1. Write it down.

I've always been a paper and pencil kind of girl, and probably always will be! Distance learning doesn't change the need for an outline of what your week is going to look like. Whether you use a paper planner, or digital planner, sketch out your vision for the week ahead! If you're feeling ambitious, take a half our after school on Friday to sketch out ideas for the next week. If you're like me, I enjoy doing this over a cup of hot coffee, in my PJs on Saturday morning. Again, keep it to a half hour or so! Time can easily get away.

teacher planner


2. Batch your tasks.

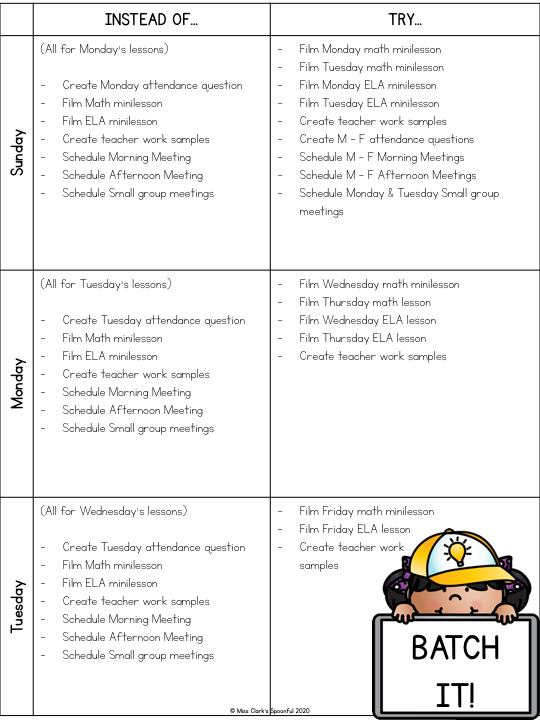
Similarly to life in the classroom, distance learning means providing instruction through a lot of different modalities. Direct teaching through a minilesson. Small group work. A craft. Workbook pages. A digital lesson. The list goes on and on.

Batching is when you group a list of similar tasks together to complete over a dedicated time period with no interruptions. It looks something like this!

task batching

That's right. Commit yourself to spending time in your workspace, and put your phone away. Task batching cuts down on the time that it takes for you to switch and refocus on tasks that require a different source of brainpower!


3. Drafting is your friend.

google classroom
This will especially apply to Google Classroom teachers. Once you've got the batching down, you can put assignments in for a certain date without actually scheduling or posting them. "Save as draft" is another way of saying, "just hang out here in a safe place for awhile until you're ready, hard work!"


4. Find a balance between online and offline.

When we first started our remote learning platform (approximately 8,000 years ago), I had it in mind that I'd get through every single aspect of our curriculum. Online. I'd faithfully utilize the digital resources from our math and reading programs. I soon discovered, technology is fickle. While some aspects worked, others didn't. In the beginning, the kids had to put more effort into logging on or connecting with a certain program. That's not what it should be about!

I soon realized, that by providing a balance between an online minilesson and a hands-on activity, that my students were thriving. My second graders inspire me every day with their creativity! Here's an example of this week's phonics lesson about the au/aw sound. The kids LOVED the dino theme! We learned about the au/aw sound through this fun story, and enjoyed a lesson about dinosaurs.

The activity that went along with these lessons: What would you do if you saw a dinosaur? Can you name aw/au words on your dinosaur's spikes? Here is an adorable example of a completed project.

dinosaur


5. Give yourself grace. Lots of it.

I had a legitimate panic attack after Day 1 of distance learning. This mode of teaching felt weird, disconnected, and out of my control. As we've finished week 5, we've gotten into a rhythm. My students inspire me every day with their resilience and positivity. I've learned that as teachers, we are doing the best that we can, and that our families are unbelievably thankful for all we're doing. Being flexible isn't always something that's easy, but it's necessary.

Do the best you can do. That is more than enough.

0

The Best Way to Upgrade Your KWL Charts!

KWL Charts are a magical teaching tool.

These graphic organizers help students organize their thinking before, during, and after lessons. I particularly love using KWL charts when introducing a new non-fiction unit. From activating schema and prior knowledge (K), to asking thoughtful questions about the topic (W), to discovering new learning (L), KWL charts are a systematic way for students to document their journey through exploring a new and exciting topic.


Tip: Use post-it notes during whole group mini-lessons to make KWL charts interactive!


Remember that whole schema/prior knowledge collection part of the KWL? That K part isn't always so straightforward.

Sometimes, students think they know a lot more than they actually do abut a new topic.

I'll wait while you recover from your disbelief. ;)

As teachers, we want to honor all student ideas and encourage participation. We also want to provide accurate, factual information in our lessons. So, when little Johnny channels his prior knowledge to add to the "K" section of a class KWL by confidently saying, "Penguins only live in places above the equator," that might be an okay time to intervene and correct him by saying something like, "Actually, penguins only live in the southern hemisphere, below the equator! We'll find out more."

This way, you're providing a gentle correction and not spoiling everything in the lesson ahead.


Now here's where the "K" can get tricky.


One day, Susie chimes in to add to the "K" section of the Polar Bear KWL with, "Polar Bears have white fur." As the resident polar bear expert, you know that polar bears actually have fur that is see-through. 

What's a teacher to do??? 

This is an important concept that will probably be learned during the lesson, so you might not want to shut Susie down right away.

But the thought of writing "Polar bears have white fur" and leaving it there gives you palpitations. 


INTRODUCING.... The "Misconceptions" Section!


I know what you're thinking. You don't have to call it a KWLM chart.

All you need to do is stick another section or column to your KWL Chart labeled "Misconceptions." As students engage in the new learning, or "L" section of the chart, they may discover a new concept that corrected something mentioned in the "K" section. 

During your polar bear lesson, Susie will learn that polar bears have fur that is see-through. The lightbulb will go off. She'll plop that info right in the "L" section. At the end of the lesson, Susie will note in the "Misconceptions" section of the KWL Chart that polar bears do not have white fur. 

If you're using an interactive approach to the chart with sticky notes, all you have to do is simply move the sticky note from the "K" section to the "Misconception" section.

Providing space to record misconceptions can take KWL Charts to the next level. Plus, your students will LOVE learning and using the word "misconceptions!"


Remember, feel free to leave some of that slightly inaccurate information right where it is in that "K" section. Give students room to learn and adjust their schema. It's all part of a pretty awesome process!


2

Easy Weeknight Roasted Vegetable and Quinoa Harvest Bowls


I LOVE to cook. For me, it's is a fun, creative way to relax. That being said, most of these feelings in the kitchen happen during the weekends or on "vacation" days (If you have a stress-free day to whip up a four course meal on a weeknight, teach me your ways!).

Friends, weeknight dinners are tough. No matter which season of life you're in. Between homework, extracurriculars, meetings that run late, and you know, taking care of all of those real life things, it can be tricky to squeeze in a healthy, satisfying dinner. Time is of the essence, but takeout is expensive. Deliciousness is key, and so is treating your body nicely. 

I've got you covered! Here is one of my go-to simple & delicious weeknight dinners.


Weeknight Roasted Vegetable & Quinoa Harvest Bowls

roasted vegetable harvest bowl

Prep: 10 minutes
Cook: 30 minutes
Serves 4 - 6


Ingredients:

Roasted Vegetables:

  • 14 oz. package butternut squash, cubed
  • 12 oz. package fresh Brussels sprouts
  • 1/4 cup olive oil
  • 1/2 teaspoon salt
  • 1/2 teaspoon pepper

Easy Quinoa Pilaf:

  • 1 1/4 cups whole grain quinoa (about 7 oz.)
  • 1 3/4 cups low-sodium chicken broth
  • 1/4 teaspoon ground sea salt
  • 1/4 teaspoon ground black pepper
  • 1/3 cup chopped fresh cilantro or parsley
  • 1/3 cup pine nuts

Directions:

Roasted Vegetables:

  • Preheat oven to 425°F.
  • Cut Brussels sprouts in half, lengthwise.
  • Cut butternut squash pieces into 1-inch cubes.
  • Place Brussels sprout halves (face up) and butternut squash pieces onto a baking sheet lined with aluminum foil.
  • Drizzle olive oil onto Brussels sprout halves and butternut squash pieces. Sprinkle with salt and pepper, to your liking.
  • Bake in the oven for 20 minutes, or until vegetables are golden brown.
  • Remove veggies from the oven, and let stand.

Variation:

* For an extra kick of protein, include extra-firm tofu (drained and cut into 1-inch cubes) to roast along with your vegetables! a 14 oz. package is perfect for this recipe.


As your veggies are roasting away, start on the Quinoa Pilaf.


Easy Quinoa Pilaf:

  • Bring chicken broth, salt, and pepper to a boil in a medium saucepan, over medium-high heat.
  • Stir in the quinoa.
  • Cover and reduce heat to medium low.
  • Simmer until all the broth has been absorbed (about 15 minutes).
  • Turn off heat, and let quinoa stand (still covered), about 10 minutes.
  • Meanwhile, heat a skillet over the stovetop on medium heat. Scatter pine nuts into the skillet, gently shake frequently, and toast until golden brown (about 3 minutes). Turn off heat.
  • Chop parsley or cilantro. Mix herbs and pine nuts into the quinoa.


Finally, scoop some quinoa into the bottom of a deep serving bowl. Top it all off with your roasted veggies, and boom! You've got yourself a deliciously satisfying weeknight dinner. Enjoy!

0